SAR LMS GWR

SAR LMS GWR
SAR "Commercial Street" - LMS "Wellingford & Bakewell Bridge Railway" - GWR "Porthminster" - Port Dock Station

Wednesday 12 August 2015

Growing weeds....!

The long job of placing weeds around the yard will be spaced out over the course of the build so I don't go crazy doing it...! In between each structure build I plan to plant weeds that were so evident during the era I am modelling. The tufts are placed on one by one with a dob of PVA glue using tweezers.
I started at the station - both the outer tracks will be covered in
weeds as they were not used much later in their life.
Port Dock Station in 1955. Photograph by D. Castle. This shows
clearly the poor state it was in and how weeds are quite
evident on the tracks that were not used much.
The effectiveness of these weeds is shown here.....


The weeds or "Tufts" are from the MiniNatur range and the colour chosen here is "Late Fall" for HO scale.

Port Dock Goods Shed

Progress with the goods shed saw it completed in few days. A quick sketch of the shed was made and the length determined by the fouling points at each end of the passing loop that goes around the shed. The rear profile boards were added and cut out with a jigsaw (6mm MDF). This acts as a sturdy rear "wall" for the half relief shed to be glued to when completed.
Later after the shed was nearing completion, I cut out a section in the rear
profile board to allow light into the shed as it was too dark for
the operator to see his wagons for shunting.
A piece of aluminium sheet was used to "laminate" all materials to......timbers were bandsaw cut Western Red Cedar (but any timber will do except Balsa), ends are Evergreen 2mm "V" groove by 1mm sheet thickness for strength.

Hand filing out the ends of the valances

The compound curve end valance "teeth" were filed out by hand. Roof material is "Corrugated Card" available at the newsagents. This is a great representation of the old "Deep Six" asbestos sheeting used everywhere in the 50s, 60s & 70s

The Goods Shed at Port Dock around the 1900s.
This shows clearly the signage back when it was fresher.
The text for the "Amgoorie Tea"
advertising sign on the side of the goods
shed was printed out on some photo paper.


The side wall was covered with corrugated iron from "Slaters" range of styrene sheets. A base colour of pale blue painted on then the stencil for the "Amgoorie Tea" sign made. The font I chose is "Britanic Bold" which isn't exactly like the original but its good enough for me. I had to stretch the lettering before printing on my printer and made the right length to fit. The original did have more advertising at the southern end but this model is only half the length of the real one so just the "Amgoorie Tea" was used. 
The cut out stencil placed ready for airbrushing the letters.


End view through the completed shed

The shed placed in position to see how it looks.
The blue grey on the ends was repainted
after learning of the correct colour in the
late 1950s and early 1960s.


After repainting the ends with a peach colour that was used on the shed in the late 1950s and early 1960s, and the office built on the end, it was weathered and installed. I also cut out the rear profile board with a long opening to let some light in as it was too dark during shunting operations to see where the wagons were placed under the shed. 
The completed Goods Shed with a "P" Class shunting for the first time!

Ballasting and Weathering the track

Some forward planning of turnout and signalling rodding was needed so I knew where the rodding would be placed. I cut up some 40 x 40 Thou styrene strips and supaglued them down. On the plan you can see the signal cabin is central to the yard so all radiating rodding will terminate at the cabin. Only bthe main lines are controlled by the cabin and all other turnouts controlled by ground levers. The signals in the main station platforms would be cabin operated and the home signal near the ash pits would be as well.


Ballast....well no special process here other than a good way to settle the grains of stone around the sleepers is to tap the rails with the handle of your brush. This action will bounce the grains off the top of the sleepers and "tamp" them between the sleepers. 


The styrene strip is used between the baseboard joins to stop the ballast glue sticking them together and makes for a nice separation of the ballast without it cracking and chipping away.

Aquadhere doesn't stick to styrene well at all, so it’s put to good use here. Ballasting is completed......


With all the track ballasted glued and dry, the build-up of ballast around the running shed tracks needed some attention clearing the flange-ways before painting the ballast. Then the entire track on the layout was then weathered. The concrete areas at the running shed were covered to avoid paint landing on them. The area was air brushed with matt black, then oversprayed with a light brown and grey mixture. 

As stark as this looks, it will blend in with weeds and infrastructure added. Put a few locos on it and the potential for mimicking the prototype increases. There is darkening of track needed in other areas where locos will sit for periods of time, such as at the ends of platforms, and the tracks used more than others need to be dirtier. The two outside tracks of the station platforms were left "cleaner" as they will be covered with weeds. Below are a few locomotives placed just to see how the weathering colours look. With added details and weeds around the area, the dirty looking area around the engine shed will blend right in!
A sign of things to come! Three locomotive classes that would have been seen in the 1950s,
a "K" Class on the left, a "P" Class in the centre and an "S" Class on the right.
All these were models I have scratchbuilt, the "S" Class the most recent.


Connecting the two layouts & Platforms

I had recently finished the wiring to power up the each of the blocks and had a test run to operate Port Dock with Commercial Street and the operation was quite successful. The connection track from Commercial Street has proved a bonus for operation as shunting moves from Commercial street yard can use it as a headshunt.
At the end of Commercial Street, a small 100mm long section
of the straight track was removed and a new re-aligned peice of new track added.
Platform construction, basic open frame using balsawood, supaglued to the baseboards which won’t lift during ballast gluing.  

I chose a mortared bluestone walling for the platform edges to match the old photos I have of them. The paper was sprayed with Dullcote™ and dried quickly in front of an air blower heater to seal from moisture. The bluestone walling was cut into strips and glued on with PVA glue. Matching the stone pattern at each end of the pieces was tricky, but I had cut up several strips and you can pick from them to match the stonework as best you can.
I photographed a bluestone wall then stitched together several
copies of the image and printed out on my printer. 


Platform tops were made from 2.5mm balsawood shaped to allow them to overhang by about 1.5mm all around except where the main station building will be situated. These strips were Supaglued down for quick assembly.


The concrete blocks are represented by some Metcalfe Models™ paving, cut into strips and PVA glued on flush with the edges.


Decoration of the platform surface in this instance is to represent old cracked tarmac or asphalt. I used 800 grade "Wet & Dry" abrasive paper. Cut and shaped to fit inside the edges of the blocks. 


Finishing with black weathering powders.

Then brush it with powders to weather, then scratch in the cracks the back of an Xacto knife and then rub over with your finger. This fills the cracks with residue from the powder.


The blocks need to be separated with
actual gaps, so knife these in before
final weathering with black powder. 


The finished result with cracked and weathered asphalt or "Tarmac"

Turnout mechanism and Slide Switch install

Time to prepare for the point switches. Each point position was marked out with a white line along the edge of the baseboards, a 1.8mm hole drilled for the actuating rod right where the line is and within that 2mm space you see just below the 2mm MDF baseboard. 1.2 to 1.5mm spring steel wire is used for the actuating rod.


 Then a hole of 4mm for wires drilled on an angle to enter just under the baseboard.


The three wires for each turnout pass through the front frame.
Also the actuating wires are seen poking out as well.

I bent up the 1.5mm spring steel wire into “V” shape, added a plastic guide made from 20thou styrene and Evergreen™ hollow 3mm square rod. The guide holds the rod in place and stops it falling out of the point tie bar. The "V" acts as the "take up" for the longer travel of the slide switch. Once all the point rods were done the switch panel was installed.


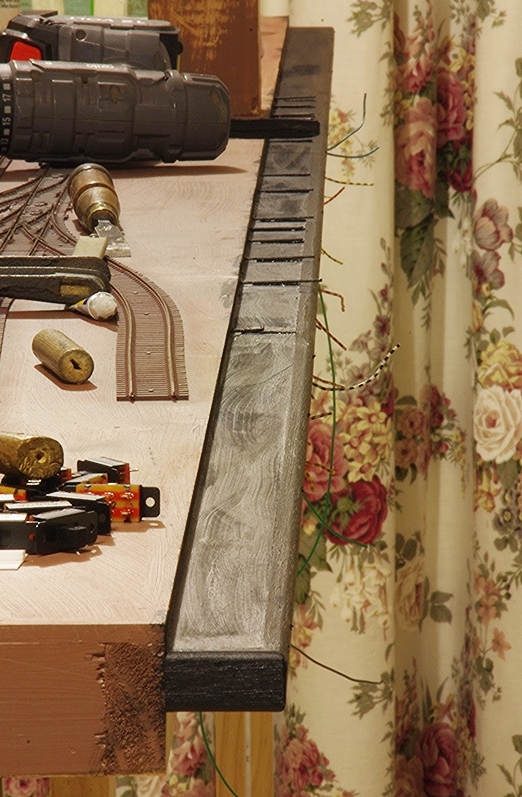
The switch panel was marked out with the position of each slide switch. 30mm x 11mm Pine was used for the panel. The shaded area was then cut out.


The Pine panel needs to be PVA glued to the frame 2mm below the 6mm MDF baseboard all the way along using long nails, so I pre-drilled the panel before nailing to prevent the pine splitting.


The front switch panel which runs the entire length of the three modules is 30 x 11mm Pine with the slots cut in to accept the switches when completed, and was held in place with pre-drilled long slim nails.


The Tasmanian Oak (but any hard wood will do with a “D” shape profile) rail was then added along the outside. This forms the holes for the slide switches. The front ledge was painted black so I could fit the switches the next day. Electrical wires were then soldered between all of the turnout frogs and wing rails to their respective switches. 


The actuating rods needed to be trimmed with side cutters, then bent to 90 degrees and slid into a hole drilled into the centre of the slide switch close to the plate. Two small screws then hold the switches in position.
The slide switches wired to their respective
turnouts. These are double pole double throw
switches and only one set of poles were used.