SAR LMS GWR

SAR LMS GWR
SAR "Commercial Street" - LMS "Wellingford & Bakewell Bridge Railway" - GWR "Porthminster" - Port Dock Station

Saturday 9 February 2019

Switch stands for the yards

Researching switch stands fot the yards and main line turnouts was a difficult task and one I found to be frustrating. There appeared to be  ,more than just a few different styles that were employed along the length and breadth of the Virginian Railway. I narrowed down the target style in my chosen area of the VGN in and around the New River which includes the old absorbed Deepwater sections of the Virginian lines. These had a circular target and and horizontal arrow.
The target colours are red for the circular and yellow orange for the arrows...
 Also evident in certain yards were the small switch stands with the four aspect lamps with coloured targets. I used a small block of timber with four washers glued around the outside.
The small 10BA washers were dished out using a centre punch into some plastic!

Components included a small piece of tube and other cut pieces of styrene.
The basic switch stand completed without throw lever.

A cluster of switch stands if that's what you might call them...
These were then coated in Dullcote and are now ready for installing on the layout at a later time.

The handcar shed and store room...

Also available from laserkit.com is their Cullen Handcar shed kit. This will compliment the Depot building. Just not decided on where it will be placed in the station yard yet but that will be decided when the scenery is under way on the layout.

 Just to make the standard style building a little different from the others, I added an extra store room on the end from the leftover wall parts in the kit.
Completed with the timber tacks in front to rail side.

Weathered with powders and with the original white doors.

A Depot for the station area...

The station down at the wharf needed to be small and the laserkit.com kit No.180 of Cullen was just what was needed. A nice kit to put together. I pre-painted the ribbed walls with orange acrylic paint before assembly.
I chose to use the earlier Virginian Railway orange and white paint scheme as opposed to the later grey paint scheme as it looks so much nicer. I know strictly speaking it should be grey for 1959 but my excuse is this station wasn't updated when most of the rest of the VGN system was done.
the basic building assembled.

Completed before weathering.

The waiting area shelter has nice detail.

Weathering with powders and little dry brushing.
The freight room door should be white too but I didn't paint that to give the impression it was probably replaced at some stage in its life and not painted. The splintered timbers on the timber platform sides come like that and is nice touch to give some age.

Coal loads for VGN and N&W Hoppers

We recently got stuck into make the coal loads for our hoppers. We want to be able to load them in at the tipple loaders, run the trains to the Port and unload them there. This will hopefully give a better life like operation on our railroad. We gathered all the hoppers together, and over a few evenings we made them all production line style. We started with the load made from balsawood. We chose to use the carved balsawood method as its easy, reasonably quick and gives the desired look we want.

As there were four different sizes of hopper to make loads for we had to count out each size and make them to fit. We have a mix of Accurail, Atlas, Athearn, and Bachmann hoppers. Each had to be customised for correct depth using blocks glued at each end to support the load to allow it sit level.
We will be making a magnetic wand to allow the operator to remove and place the loads into the hoppers. We tried a small button sized rare earth magnet and this appeared to be good for the lifting of the load. We screwed in a small countersunk screw in the centre of the balsawood load for the magnet to search for...
Testing the magnet.
The loads were carved into two or three profiles, some flat topped, some with multiple heaps and some rounded. The loads needed to appear above the top of the hopper sides as they appeared in historic photos.
A load sitting in an Accurail hopper.
The loads for my hoppers were then sprayed from a cheap Matt Black pressure pack, making sure the black covered the sides and ends as well as the tops.
PVA wood glue was applied
to the dried black load.
The glue was spread out as
evenly as possible - but not
on the sides or ends.
We crushed up real coal and sieved the pieces into three usable grades that we though would look right. A fine grade called "pea", a mid sized grade called "egg" and a larger size called "lump". These sizes are three of the five grades that were to come from tipples in the Appalachians that I had found during my research. The other two were "slack" and "nut" grades.
Seen here with mid sized "egg" grade. The coal was
just sprinkled on from above, the side and ends to cover
as much of the black surface as possible.
Some close up shots of the completed loads......
Coal loads with "pea" sized grade and on a multi heaped load base.
Coal loads with "egg" sized grade.
Coal loads with "lump" sized grade.
To finalise the loads for handling, we will be coating the underneath of the balsawood loads with paint or sealant to stop them fraying. Nothing worse than seeing bits of brightly coloured balsawood sitting on the hopper edges or the layout.

Monday 28 January 2019

The New River Company Tipple

I acquired a Walther's Cornerstone New River Mine kit and built it to instruction. Quite a beast of a kit in size. Noted was the fact that all the windows in the kit were not painted. So using my finger dabbed onto a thin pool of black paint, I dabbed the window frames to colour them.
I always knew it would need to trimmed at the rear to fit into the backscene. The rear 25 to 30mm of the whole building was cut off with a Dremel cutter. The rear track would need to run through the building, so an opening was cut at the front and back.
You will also see the tracks in the yard have been relaid...! This was necessary to accommodate the wider track centres of the loader. A little less track space but was necessary obviously.
 After cutting off the back, I added details such as the boardwalks, steps to the boardwalks with hand rails.
Once all the added details were painted, some weathering was started to bring it into the late 1950s era. Horizontal lines were drawn around the corrugated cladding with pencil to represent the joins in the sheets. Weathering was done using enamel paint dry brushed on for the rust. The first pass with the brush is shown in the above photo and another pass in the below photo with a slightly different colour. Black soot stains were made with black powders. Resting in its final position, it will be an imposing feature on the layout.
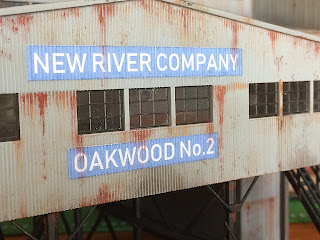
After some research on the area most likely to have a tipple on the Virginian Railway that at least looked like this model, I settled on the New River region in West Virginia. So I picked a fictitious extra tipple that was located at Oakwood.
The signage I designed on my computer and printed on plain paper on my ink jet printer. I then applied PVA glue to the back and pushed the paper into the corrugations on the surface. This gives the illusion of the sign writing being painted onto the corrugated iron.

The bridge that links our layouts

We could have joined the layouts via the lower level at the pier but decided it would be better to do so at the upper level. This required the trestle bridge on my part of the layout to slightly extend to the baseboard edge. Geoff's layout would then need a bridge in the same style to match up. So I built the whole bridge across the join.
I purchased some "Bents" that were ready made and available in different heights. Starting with the central part of the bridge, I worked out a spacing that allows a nice spacing and would also look right for the heavy locos that would be driven over the deck. Having them close together will visually look right and strong enough to support an articulated steamer.
The spur siding needed clearance for a boxcar so the "Bents" either side needed to be angled.
This shot give you an idea of its size with one of our 2-8-8-2 VGN steamers on the bridge.
The main deck support was piece of Meranti sanded up and suitably stained to match the Bents.I cut up a heap of extended width sleepers for the deck and individually glued them onto the main timber deck. The gap in the centre is where the join will be.
At the join, some copper sleepers were employed to gain strength. Some stock Code 70 rail was then spiked down and gauged accordingly.
Along each side of the sleepered deck a stringer was glued down to strengthen everything as per a drawing of these original style bridges. With added cross bracing and horizontal braces the bridge now looks the part. The whole bridge was then re-stained with wash of black Indian ink thinned out and brushed over all timber parts of the bridge to give that weathered look.
Geoff made a couple of small plate girders to add over the planned roadway which sits between the river and the rising land to the right of the photo. At a later date I added check/safety rails down the centre of the track on the bridge. Next we continue finalising track laying.... 

Tuesday 22 January 2019

Track work in progress...

The baseboards took some time to be built due to some complex roadbed alignments and once we were happy with them we spray painted them all entirely to seal the timber work.
Geoff's end at the Port.
Once they were dry we started on track laying. Like the days of old when railroads were built from each end and met in the middle, so we did the same.
Most of the track in place - a
layout mounted on
the wall behind is not
part of this project.
We just had to place a train on to satisfy our need for progress.....
My end at the tipple loading tracks.

Monday 14 January 2019

Yes, it's been awhile....

I must apologise for not posting any updates here since 2014/15. I was introduced to Facebook and I thought it was wonderful, but I'm sort of over it now, its so intrusive, so I'm ramping that down and will endeavour to post here a bit more regularly. This also means I haven't checked email comments here either which I forgot about. Just read through them and I didn't expect this much interest. I'll try to check the comment more often.

That means I need to catch up on what I've built in the last few years - which is a lot to ask really. I have built another Great Moor Street fold up layout and have started another English layout. Both of which I will endeavour to post some shots of here.

Anyway I'll start with an update on my Virginian Railway layout. Since the first post on this layout, its progress has been slow, but its at the stage of powering up and testing everything at present (January 2019). My friend Geoff and I have been building our two layouts together at his house. So I've had to venture to his place to work on it over the last two and a half years. Geoff's layout is of course on the Norfolk & Western theme and mine is on the Virginian Railway (not Railroad) theme. The Virginian was referred to as a Railway and not a Railroad as some might think, even though its American.
A lot of timber work was required for this layout due to its hilly nature. Seen here with supports and roadbeds before adding the profile boards along the front.
The profile boards now fitted. There are the three modules of my layout at the rear and the three of Geoff's from front. But later a new module will be added. Details later. The layout total length is 40 feet. (12.2 metres)
My section of the layout is based on Linn H. Wescott's design of the Port Ogden & Northern Railroad on Page 6 of the 101 Track Plans For Model Railroaders book. A quaint and very interesting concept that influenced my choice of design.
I made some changes to make it a little easier to shunt. Some tracks are re-arranged in the station area and access to the station from the mine tipple differs from Linn's plan. Turning a train around in the tipple yard that has come from the station is made easier and can be sent away to Geoff's layout engine first.
Next update will be of the track laid out and some small changes to the tipple yard. Till next time ..... Happy Railroading!